Writing ZK Proofs
ZK proofs in DarkFi are written in a simple low level DSL. The zkas compiler then converts this human readable code into bytecode that is run on the DarkFi ZKVM.
Zkas Usage
To build zkas, run:
make zkas
We can then see the help output with zkas -h.
To compile a .zk file, simply run:
$ zkas proof/opcodes.zk
Wrote output to proof/opcodes.zk.bin
It's worth running zkas -i proof/opcodes.zk to get a sense of what
instructions the bytecode will send to the VM. We can also see the data
structure with -e as well.
Structure of a ZK File
Take a look at existing ZK files in proof/ directory for examples.
See also src/contract/dao/proof/ and src/contract/money/proof/.
In all of those directories is a witness/ subdirectory containing
witness JSON files that can be used with the zkrunner and zkrender tools below.
k = ... indicates the number of rows which is . Bigger values make
your proof slower, whereas if k is too low then the proof generation will
fail. Pick a value that works and find the minimum allowed. Usually 11 to 13
works.
field = "pallas" indicates the base field.
The constant section specifies any constants we use.
witness section contains the witnesses provided when generating the proof.
circuit specifies the actual instructions for the proof.
Generating a ZK Proof in Rust
When compiling you will need to use the zk feature in cargo.
Check tests/zkvm_opcodes.rs for an example to follow along with.
The broad steps are:
- Create your witness values, and put them in an array. The order must match
what is set in the
.zkfile. - Calculate the public values from the private witnesses. This must be
an array of the same type (usually
pallas::Base). - Load the bytecode and generate the ZK proof.
- Optionally you can verify it.
Debugging ZK Files
The first thing you should do is export a JSON file to run with the debugger. You can do this by adding this line into Rust.
zk::export_witness_json("witness.json", &prover_witnesses, &public_inputs);Then after running the code, you should now have a file called witness.json.
Then run the ZK debugger.
./bin/zkrunner/zkrunner.py -w witness.json --prove --trace foo.zk
where foo.zk is our .zk file we're debugging.
Often this works, but the ZK proof is failing when used with a WASM contract.
In that case the culprit is that the WASM code is exporting the wrong
public values. Use the msg!() macro to print them to the program's output
log, and compare it with the public values you see in the witness.json
from when the proof was created. This will allow you to pinpoint exactly
where the error occurs.
For example files to try, see the comment in the section above Structure of a ZK File.
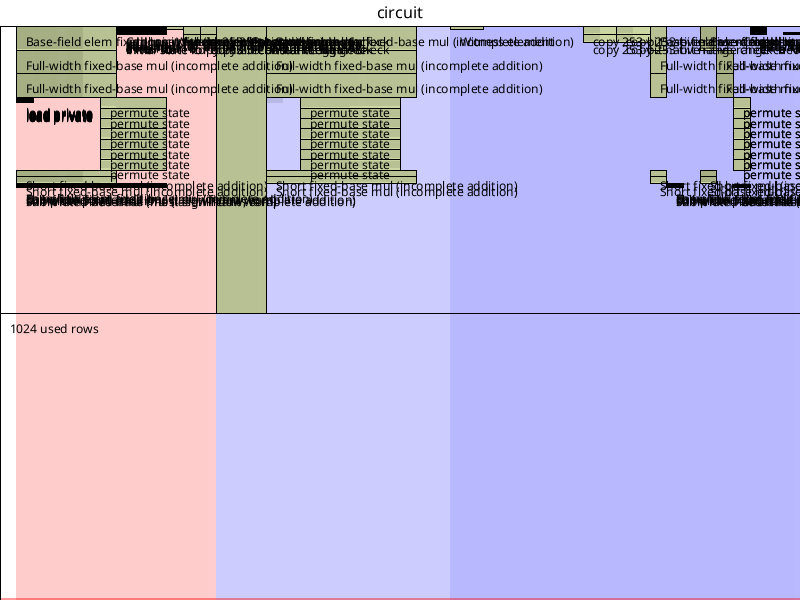
Viewing the ZK Circuit Layout
ZK circuit have a layout. The less empty space, the more efficient is your
circuit. Usually it just means reducing the k value specified. The number of
rows in your circuit is , so reducing the value by 1 will halve the number
of rows.
To generate an image of the circuit layout, simply run:
./bin/zkrunner/zkrender.py -w src/contract/dao/proof/witness/exec.json src/contract/dao/proof/exec.zk /tmp/layout.png
You should see something like: